A young friend of IT Roadmap received a Raspberry Pi 3B for Christmas and asked us for a little help in setting it up for the first time. We love Raspberry Pi for rapid prototyping, so we congratulate Santa Claus on his good choice! Raspberry Pi is a great way of helping kids achieve computer literacy quickly, and (bonus) the finished product may be a little less addictive than, say, a mobile phone or tablet. We’ll explain why when we talk about the Raspberry Pi’s operating system.
In essence, Raspberry Pi is a dirt-cheap, bare-bones, credit-card-sized computer. Remember the 80s (and even the 90s!), when people used to build their own computers out of parts they ordered through the mail? Raspberry Pi is a resurrection of that idea, except that it’s much, much cheaper. You can buy the Raspberry Pi motherboard by itself for about $35, but a better bet is purchasing one of these CanaKits, which include the Raspberry Pi motherboard, a power supply, a case, a 32 GB micro SD card preloaded with a Raspberry Pi operating system, an SD card reader, an HDMI cable, and even two aluminum heat sinks (we didn’t install these, but if you are maxing out your Pi’s computing capabilities, you might want to; these instructions tell you how). You’ll still need a monitor, a keyboard, and a mouse to use this kit as a computer.
Step 1: Explain the Raspberry Pi’s components
To start our young friend off, we started with the Raspberry Pi motherboard and explained how the various metal bits adhered to this green slab worked. The Raspberry Pi is a “system on a chip” (or SoC), an integrated circuit that combines a CPU (Central Processing Unit) and a GPU (Graphics Processing Unit). Then we pointed out the micro USB port, which would allow us to plug the computer into the wall, the HDMI port where we could plug in the monitor, and the 4 USB ports that would allow us to plug in a mouse and/or keyboard. It even has WiFi and Bluetooth capabilities!
The Raspberry Pi 3B’s full specs are:
- Quad Core 1.2GHz Broadcom BCM2837 64bit CPU
- 1GB RAM
- BCM43438 wireless LAN and Bluetooth Low Energy (BLE) on board
- 40-pin extended GPIO
- 4 USB 2 ports
- 4 Pole stereo output and composite video port
- Full size HDMI
- CSI camera port for connecting a Raspberry Pi camera
- DSI display port for connecting a Raspberry Pi touchscreen display
- Micro SD port for loading your operating system and storing data
- Upgraded switched Micro USB power source up to 2.5A
Step 2: Encase and Plug in
Next, we popped the Raspberry Pi into its case. To be honest, this was probably the hardest part of the whole operation. For some reason the case wouldn’t close properly. However, once we completed that step, the rest was easy as… you know.
We simply plugged stuff in. We inserted the micro SD card, which was preloaded with Raspberry Pi operating systems. It also gave our Raspberry Pi computer a place to store the Raspberry Pi’s operating system and any other programs we would eventually load onto it. Then we connected a monitor using the HDMI port, and a mouse using one of the four USB ports. We plugged the power supply into the micro USB port, and the Raspberry Pi came to life… there is no on/off switch. And then we could see what we were doing!
Step 3: Install the OS
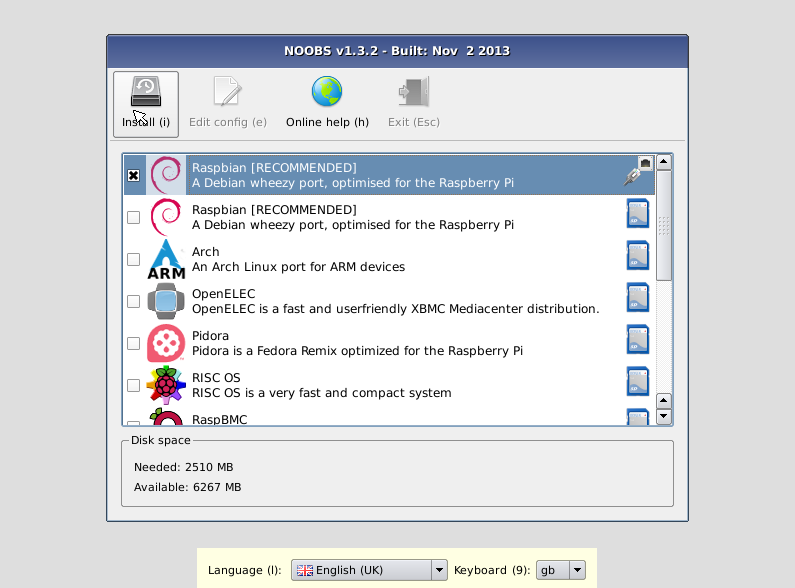
On the monitor, we saw a screen like this, and we ticked the box next to Raspbian and clicked “Install.” The installer ran, and we were ready to go! If you don’t have a micro SD card loaded with Raspberry Pi operating system installers, you can set up a blank micro SD card using these simple instructions. And while we decided to use Raspbian as the OS, you can also choose a Linux OS or even Windows 10!
When the installer finishes, you’ll see a very simple interface that allows you to connect to a wireless network, which opens up any number of possibilities. Our young friend wants to install Minecraft, and as it so happens, there’s a version of Minecraft made especially for Raspberry Pi.
The Raspberry Pi’s limited OS choices are the reason why we judge the Pi to be less addictive than an iPad or smart phone. A user is naturally going to spend more time figuring out how to do what they want to do, and this kind of tinkering is great for building computer science skills. And as for that Pi version of Minecraft? It also gives users the opportunity to dive into Python, one of the most in-demand coding languages right now!
Questions about what you can do with Raspberry Pi? Drop us a line!